
In this comprehensive engineering guide, we will completely bypass the Azure Portal clicks and build a production-ready, serverless Azure Cosmos DB for NoSQL account using the Azure CLI.
In this blog post, I tested the commands for creating a single-region Cosmos DB serverless account.
The Azure CLI commands are tested, and resources get deployed as part of the documentation process.
Prerequisites & Required Permissions
Before copying the script below into your terminal, ensure your environment and account have the correct configurations. Skipping these will cause your execution script to hit authorization roadblocks.
- Tools: Azure CLI installed locally, or an active Azure Cloud Shell session configured to use a Bash environment.
- Security & RBAC (Control Plane): Your executing identity (whether your personal admin account, a Service Principal, or a GitHub Actions CI/CD runner) must have the DocumentDB Account Contributor built-in role (5bd9cd88-fe45-4216-938b-f97437e15450) assigned at either the target resource group or subscription scope.
The Architecture & Target Design
We are programmatically deploying an e-commerce order-tracking infrastructure block. The configuration variables are designed to create a strict resource hierarchy:
- Resource Group: rg-demo-nosql (acting as our lifecycle and billing boundary in the eastus region).
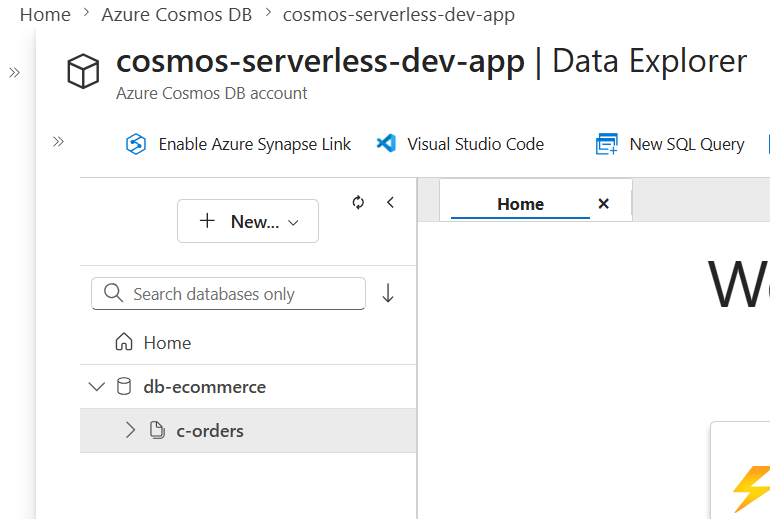
- Cosmos DB Account: cosmos-serverless-dev-app (configured strictly for Serverless multi-model access).
- Database & Container: A logical database named db-ecommerce housing a container named c-orders.
- The Partition Key: We are explicitly binding horizontal scaling to the /customerId path.
Selecting /customerId ensures a high-cardinality distribution of data across physical partitions behind the scenes, preventing “hot partitions” while making sure individual customer order history never breaches the physical 20 GB logical partition ceiling.
Step-by-Step CLI Walkthrough
Open your Bash terminal or Azure Cloud Shell and run the following deployment blocks sequentially.
1.Establish Environment Variables:
Inject these variables into your terminal session to make the subsequent commands fully modular and clean:
RESOURCE_GROUP="rg-demo-nosql"
LOCATION="eastus"
ACCOUNT_NAME="cosmos-serverless-dev-app"
DATABASE_NAME="db-ecommerce"
CONTAINER_NAME="c-orders"
PARTITION_KEY="/customerId"Feel free to change the variable names however you like. This is just for a demo account.
2.Create the Resource Group:
Create a new resource group to hold our NoSQL resources:
az group create \
  --name $RESOURCE_GROUP \
--location $LOCATION3.Deploy the Serverless Account in Cosmos DB Single region
Provision the Cosmos DB engine. The vital piece of syntax here is –capabilities EnableServerless. This flag instructs the ARM fabric to swap away from dedicated compute allocations and initialize consumption-based pricing instead:
az cosmosdb create \
  --resource-group $RESOURCE_GROUP \
  --name $ACCOUNT_NAME \
  --locations regionName=$LOCATION failoverPriority=0 isZoneRedundant=False \
  --capabilities EnableServerless \
--default-consistency-level Session4.Create the NoSQL Database
Initialize the logical database boundary inside the account. Notice that we do not include any –throughput or –max-throughput flags—doing so in a serverless account will trigger a validation error:
az cosmosdb sql database create \
  --resource-group $RESOURCE_GROUP \
  --account-name $ACCOUNT_NAME \
--name $DATABASE_NAME5.Provision the Container and Partition Key
Finally, create the container structure and map the indexing engine alongside our partition key path:
az cosmosdb sql container create \
  --resource-group $RESOURCE_GROUP \
  --account-name $ACCOUNT_NAME \
  --database-name $DATABASE_NAME \
  --name $CONTAINER_NAME \
--partition-key-path $PARTITION_KEY6.Verifying the Setup
To verify that your deployment is perfectly configured without browsing the portal UI, run this quick metadata query. It will verify that your layout and serverless configuration are active:
az cosmosdb sql container show \
  --resource-group $RESOURCE_GROUP \
  --account-name $ACCOUNT_NAME \
  --database-name $DATABASE_NAME \
  --name $CONTAINER_NAME \
  --output table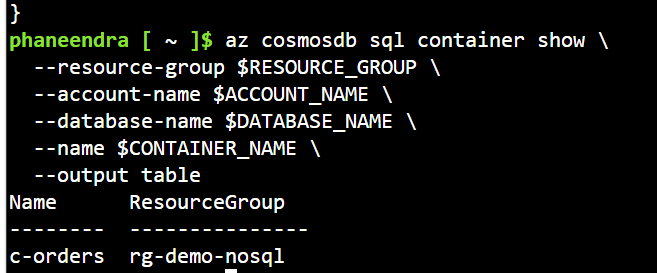
7.Clean-Up (Avoiding Unexpected Costs)
Even though a serverless database costs nothing when it sits idle, data stored in the database still incurs persistent storage costs. If you used this guide for a sandbox experiment or test, delete the entire deployment block with a single command to keep your subscription clean:
az group delete --name $RESOURCE_GROUP --yes --no-waitDisclaimer: This content was drafted with the assistance of artificial intelligence to ensure clarity, optimal structure, and depth. However, the author has fully reviewed, refined, and edited all material for technical precision. Crucially, all Azure CLI commands presented here have been manually executed and rigorously tested inside Azure Cloud Shell to verify their real-world accuracy and functionality.