
In this guide, I will walk you through the exact Azure CLI commands I use to deploy a single-region Cosmos DB NoSQL account.
I have personally tested and executed all of these commands in my own Azure CLI environment, so you can safely copy and paste them directly into your terminal.
Prerequisites
Before executing these commands, make sure your Azure environment is ready to go. You must have the Azure CLI installed, be logged into your tenant using az login command, and possess the necessary role-based access control (RBAC) permissions.
| Role Name | Scope | Why you need it |
| Contributor OR DocumentDB Account Contributor | Resource Group or Subscription | Grants the control plane permissions required to create new Cosmos DB accounts, databases, and containers. |
Scenarios We Are Executing
To give you the best foundation, we are going to look at two distinct deployment architectures for the South India region.
In both setups, I am configuring dedicated throughput at the container level. This means the Request Units (RU/s) we provision are locked strictly to that specific container, rather than being shared across all containers in the database.
You can change this to provision at a database level, if you want to share the throughput with all the containers in the database.
| Scenario | Throughput Type | RU/s Configuration | Throughput Scope | Best For |
| 1 | Standard (Manual) | Fixed at 400 RU/s | Dedicated to Container | Flat, predictable workloads and strict dev budgets. |
| 2 | Autoscale | 100 Min to 1000 Max | Dedicated to Container | Variable traffic with periods of complete idleness. |
The Core Setup (Shared Variables)
Before running either scenario, you need to establish your environment variables. Run this block in your bash terminal first so the subsequent commands know exactly where to deploy your resources.
Please changes the resource names as you wish.
RESOURCE_GROUP="rg-cosmos-southindia-log"
LOCATION="southindia"
DATABASE_NAME="prod-db"
CONTAINER_NAME="items-container"
PARTITION_KEY="/id"Scenario 1: Standard (Manual) Throughput – Fixed 400 RU/s
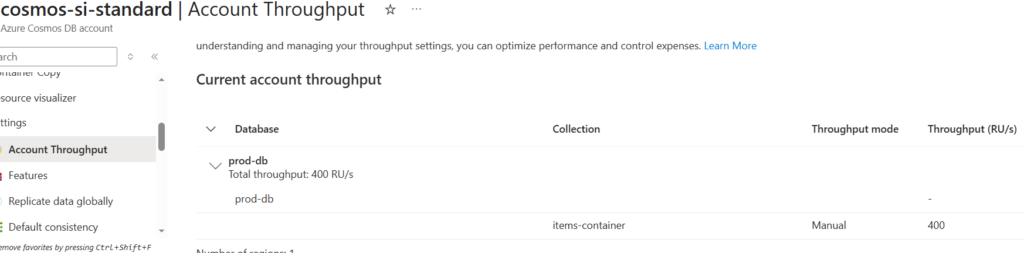
This is my go-to pattern for highly predictable workloads or dev/test environments where I want a strict, rock-bottom ceiling on my billing. This sets the dedicated container throughput to the platform minimum of 400 RU/s.
To enable zone redundancy in your single region, set ‘isZoneRedundant=True’.
Skip creating a resource group if you already have one.
ACCOUNT_NAME="cosmos-si-standard"

# Create the Resource Group
az group create \
  --name $RESOURCE_GROUP \
  --location $LOCATION

# 1. Create the Single-Region Account
# [ZONE REDUNDANCY]: Change to 'isZoneRedundant=True' if you want multi-zone HA
az cosmosdb create \
  --name $ACCOUNT_NAME \
  --resource-group $RESOURCE_GROUP \
  --default-consistency-level Session \
  --locations regionName=$LOCATION failoverPriority=0 isZoneRedundant=False

# 2. Create the Database
az cosmosdb sql database create \
  --account-name $ACCOUNT_NAME \
  --resource-group $RESOURCE_GROUP \
  --name $DATABASE_NAME

# 3. Create the Container with Dedicated 400 RU/s Standard Throughput
az cosmosdb sql container create \
  --account-name $ACCOUNT_NAME \
  --resource-group $RESOURCE_GROUP \
  --database-name $DATABASE_NAME \
  --name $CONTAINER_NAME \
  --partition-key-path $PARTITION_KEY \
  --throughput 400
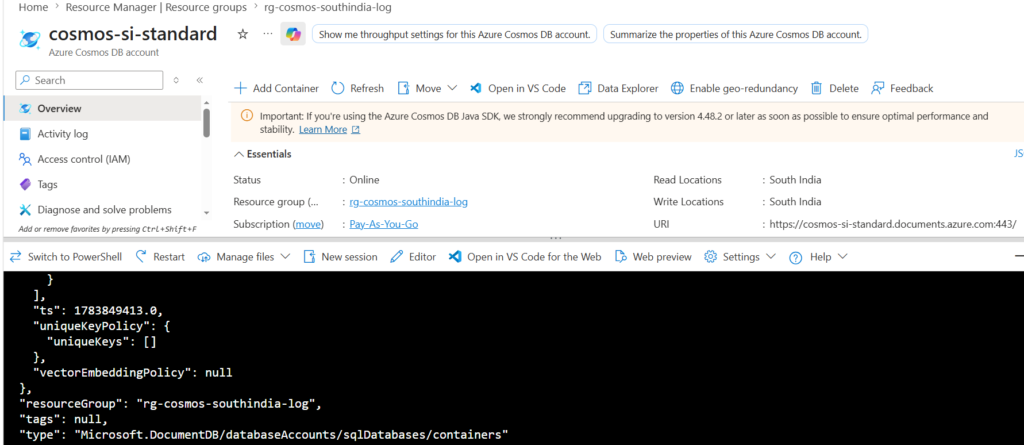
Verify now that the Azure Portal shows a single-region Cosmos DB NoSQL account on a 400RU/s throughput as shown in the below images.
Scenario 2: Autoscale Throughput – 100 to 1000 RU/s
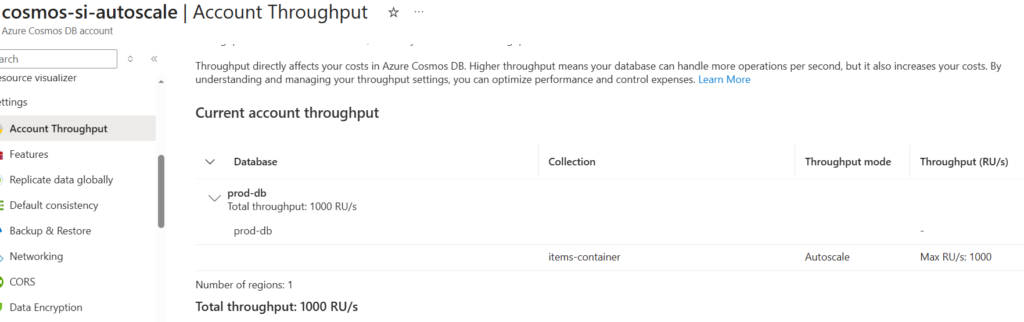
This pattern is used for variable workloads that experience periods of heavy traffic followed by complete idleness. The cost is 1.5* more compared to standard manual throughput.
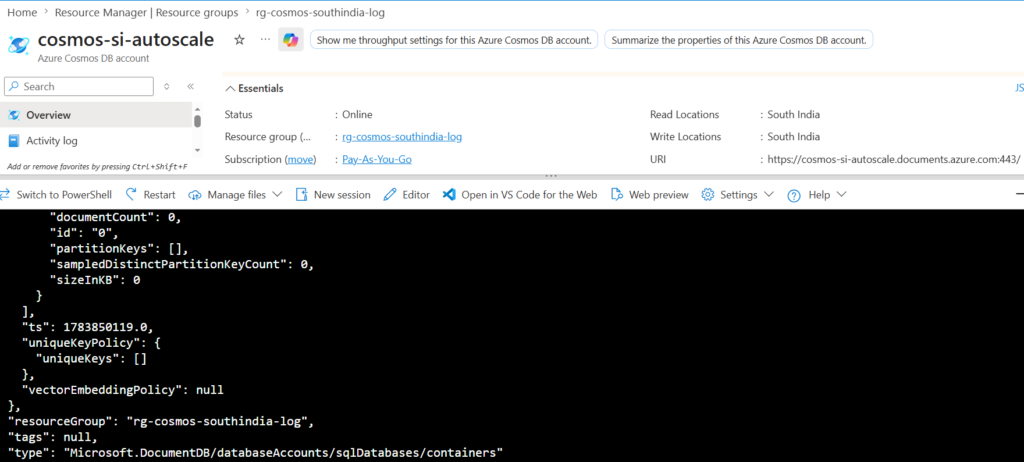
A quick note on Cosmos DB autoscale limits: You cannot set an autoscale maximum of 200 or 500 RU/s. Azure requires the starting autoscale tier to have a maximum of 1000 RU/s. Because autoscale automatically drops to 10% of the max throughput when idle, this setup gives us a baseline of 100 RU/s that can instantly scale up to 1000 RU/s.
ACCOUNT_NAME="cosmos-si-autoscale"

# 1. Create the Single-Region Account
# [ZONE REDUNDANCY]: Change to 'isZoneRedundant=True' if you want multi-zone HA
az cosmosdb create \
  --name $ACCOUNT_NAME \
  --resource-group $RESOURCE_GROUP \
  --default-consistency-level Session \
  --locations regionName=$LOCATION failoverPriority=0 isZoneRedundant=False

# 2. Create the Database
az cosmosdb sql database create \
  --account-name $ACCOUNT_NAME \
  --resource-group $RESOURCE_GROUP \
  --name $DATABASE_NAME

# 3. Create the Container with Dedicated Autoscale Throughput
az cosmosdb sql container create \
  --account-name $ACCOUNT_NAME \
  --resource-group $RESOURCE_GROUP \
  --database-name $DATABASE_NAME \
  --name $CONTAINER_NAME \
  --partition-key-path $PARTITION_KEY \
  --max-throughput 1000
Clean Up Resources (Avoid Extra Costs)
Once you are done testing these setups, it is critical to remove the resources, so you do not incur ongoing charges for the provisioned RU/s. Because both of our scenarios deploy into the same resource group, you can destroy everything at once with a single command.
The–no-wait flag lets the command run in the background so your terminal doesn’t lock up, and –yes (double hyphen) skips the confirmation prompt. It will take about 10 to 20 minutes to completely remove the resource group.
# Delete the entire resource group and all Cosmos DB assets inside it
az group delete \
  --name $RESOURCE_GROUP \
  --yes \
--no-waitDisclaimer: This content was drafted with the assistance of artificial intelligence to ensure clarity, optimal structure, and depth. However, the author has fully reviewed, refined, and edited all material for technical precision. Crucially, all Azure CLI commands presented here have been manually executed and rigorously tested inside Azure Cloud Shell to verify their real-world accuracy and functionality.
Also Read:
Different methods for inserting data into the Cosmos DB NoSQL API using Python