When migrating to Azure SQL Managed Instance (SQL MI), Linked Servers often become a critical requirement for maintaining cross-environment connectivity. They act as a vital bridge, allowing you to execute queries or call stored procedures across diverse environments whether that is an on-premises database, Azure SQL DB, SQL Server on an Azure VM, or another SQL MI.
Linked Servers in Azure SQL MI can be created using two methods.
- Linked Servers using SQL Logins (username and password)
- Linked Servers using Microsoft Entra ID (system or user assigned managed identites)
In this post, we’ll walk through how to configure linked server connectivity from your Azure SQL Managed Instance to three common targets: another SQL MI, an Azure SQL Database, and a SQL Server on an Azure VM using the security and simplicity of Microsoft Entra ID.
It is recommended to use a linked server with Entra ID configuration when connecting to other Azure cloud databases.
Table of Contents
- Why Use Entra ID for Linked Servers?
- The Prerequisites
- Demo Setup for Linked server testing using Entra ID
- Scenario 1: Azure SQL MI to Azure SQL Database
- Scenario 2: SQL MI to SQL MI
- Scenario 3: SQL MI to SQL Server on an Azure VM
- Troubleshooting Common Errors
Why Use Entra ID for Linked Servers?
Using Entra ID (specifically Managed Identities) for your linked servers provides several massive benefits:
- No more passwords in plain text: You don’t have to embed or manage SQL Server passwords in your linked server configurations.
- Centralized Identity Management: You govern access from the Entra ID portal. If an employee leaves or a service is deprecated, revoking access in Entra ID instantly breaks the database access.
- Auditing and Compliance: Security teams love Entra ID because it integrates seamlessly with Conditional Access and multi-factor authentication (MFA) logs.
The Prerequisites
Before we start wiring up linked servers, you need to lay the groundwork:
- Entra ID Admin Configured: Both your source SQL MI and your target databases (SQL MI, Azure SQL DB, SQL on VM ) must have a Microsoft Entra Admin configured.
- Managed Identity Enabled: Ensure your source SQL MI has a System-Assigned Managed Identity (SMI) or User-Assigned Managed Identity (UMI) enabled in the Azure Portal.
- Network Line of Sight: Your source SQL MI must be able to resolve and reach the target database via network security groups (NSGs) and route tables.
Demo Setup for Linked server testing using Entra ID
For this demo, I turned on public endpoint access for both my source and target databases. I performed the demo for SQL MI to SQL DB only, but the other scenarios are pretty much the same, except the provider string will change due to the change in the SQL Server hostname.
- Source: SQL MI Free Tier – public access enabled even though the resource is deployed in a virtual network.
- Target: SQL DB Free Tier – public access enabled
- System-assigned managed identities are enabled on both the source and target servers. You can opt out enabling SQL DB system assigned identity as we cannot create linked server in SQL DB.
Note: You can also use user assigned managed identities as well to support the linked server connectivity.
Scenario 1: Azure SQL MI to Azure SQL Database
Follow these steps to connect to a single Azure SQL Database from Azure SQL MI using Entra ID.
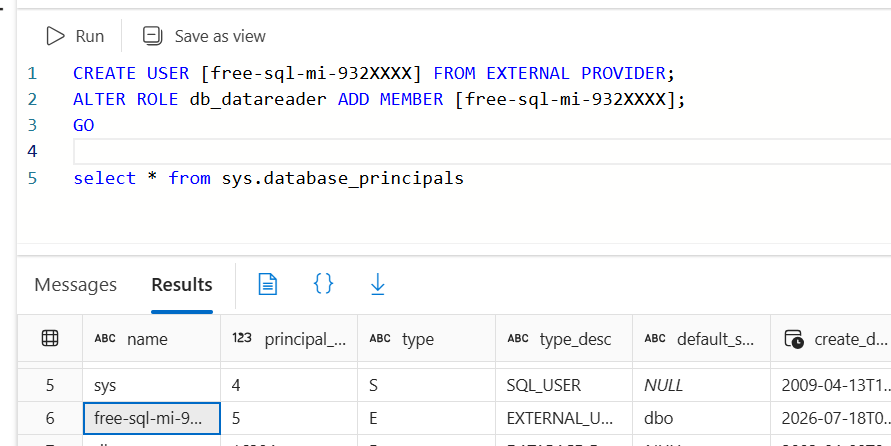
Step 1: Create the User on the Target Azure SQL DB
Unlike SQL MI, Azure SQL Database uses contained database users. You don’t create a server-level login. Instead, connect directly to the specific target database inside Azure SQL DB using SSMS as an Entra Admin.
-- Run on the TARGET Azure SQL DB (User Database)
CREATE USER [Source-SQL-MI-Name] FROM EXTERNAL PROVIDER;
ALTER ROLE db_datareader ADD MEMBER [Source-SQL-MI-Name];
GO
I used the AdventureWorksLT sample database when creating a SQL Database, but my Azure SQL Database is named free-sql-db-86XXXXX.
Since I am using system identities, I used the SQL MI resource name (free-sql-mi-932XXXX) to create a user in Azure SQL DB. In the above SQL Code to create user, replace Source-SQL-MI-Name with your SQL MI resource name.
Assign necessary role like db_reader or db_owner or any other role depending on the requirement.
Step 2: Create the Linked Server on the Source SQL MI
Now, go to Azure SQL MI and create a linked server using Microsoft Entra ID.
As Azure SQL DB requires you to connect to a specific database (not just the server endpoint), you must specify the @catalog parameter. The connection is fully secure using TLS 1.2 endpoint as we are not using TrustServerCertificate = True command here.
-- Drop the linked server if it already exists to recreate it cleanly
IF EXISTS (SELECT * FROM sys.servers WHERE name = N'TargetSQLDB')
    EXEC master.dbo.sp_dropserver @server=N'TargetSQLDB', @droplogins='droplogins';
GO

-- Create the linked server with the provstr parameter
EXEC master.dbo.sp_addlinkedserver
    @server = N'TargetSQLDB',
    @srvproduct=N'',
    @provider=N'MSOLEDBSQL',
    @datasrc=N'tcp:cloudnerchuko.database.windows.net,1433',
    @catalog=N'free-sql-db-8623360',  -- Important for Azure SQL Database name
    @provstr=N'Encrypt=yes;Authentication=ActiveDirectoryMSI;' -- Needed for Managed Identity authentication
GO

-- Map the login to use the Managed Identity specified in the provider string
EXEC master.dbo.sp_addlinkedsrvlogin
    @rmtsrvname = N'TargetSQLDB',
    @useself = N'False';
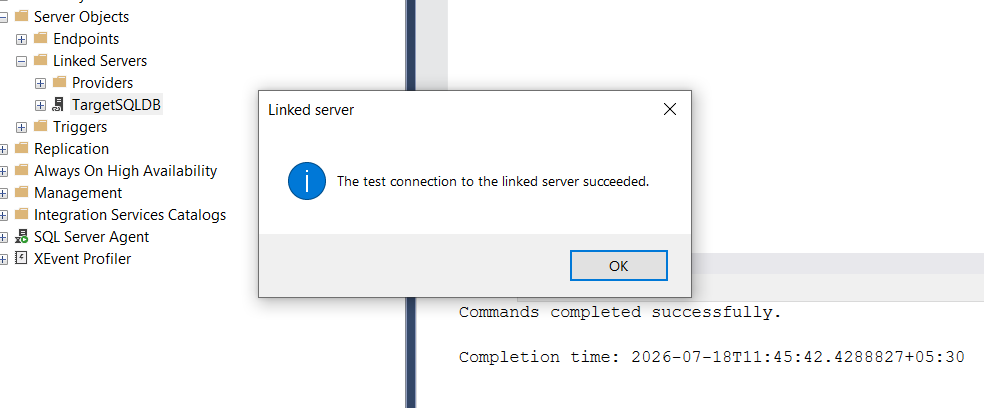
GOOnce you execute the above script with correct details, the linked server connectivity will be successful.
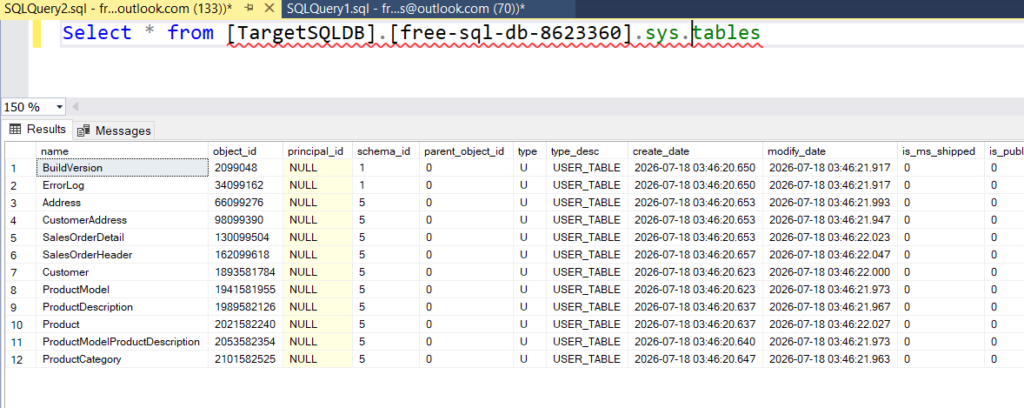
You can also read the data, as I have only read permissions enabled on SQL DB. I queried the tables in my SQL database and got the below output.
I haven’t tested the two solutions below yet, but aside from potential network connectivity issues, the scripts are almost identical. The only differences are the hostname and database name in the data source and catalog parameters.
In the future, I’ll test the two scenarios below and update the screenshots in the blog post. If any errors come up during SQL Server connectivity, I’ll cover them in a separate new post.
Scenario 2: SQL MI to SQL MI
Connecting one Managed Instance to another is a very common pattern for enterprise data-warehousing or cross-departmental queries. The most secure way to do this is by allowing the source SQL MI’s Managed Identity to authenticate against the target SQL MI.
Step 1: Grant access to the Target SQL MI
Log into your target SQL MI using SSMS (as an Entra admin) and create a login for the source SQL MI’s managed identity (the name of the identity is exactly the name of your source SQL MI).
-- Run on the TARGET SQL MI
CREATE LOGIN [Source-SQL-MI-Name] FROM EXTERNAL PROVIDER;
GO

-- Grant necessary permissions (e.g., db_datareader on a specific DB)
USE [TargetDatabase];
CREATE USER [Source-SQL-MI-Name] FOR LOGIN [Source-SQL-MI-Name];
ALTER ROLE db_datareader ADD MEMBER [Source-SQL-MI-Name];
GO
Step 2: Create the Linked Server on the Source SQL MI
Now, log into your source SQL MI and create the linked server. The connection will be securely encrypted using TLS 1.2.
-- 1. Drop the linked server and associated logins if it already exists
IF EXISTS (SELECT * FROM sys.servers WHERE name = N'TargetMI')
    EXEC master.dbo.sp_dropserver @server=N'TargetMI', @droplogins='droplogins';
GO

-- 2. Create the linked server using the Entra ID Managed Identity provider string
EXEC master.dbo.sp_addlinkedserver
    @server = N'TargetMI',
    @srvproduct = N'',
    @provider = N'MSOLEDBSQL',
    @datasrc = N'tcp:dummy-target-mi.database.windows.net,1433', -- Dummy hostname with TCP forced
    @catalog = N'dummy_database_name',                           -- Dummy catalog (target database)
    @provstr = N'Encrypt=yes;Authentication=ActiveDirectoryMSI;';            -- Instructs provider to use Entra Managed Identity
GO

-- 3. Map the login to use the Managed Identity specified in the provider string
EXEC master.dbo.sp_addlinkedsrvlogin
    @rmtsrvname = N'TargetMI',
    @useself = N'False';
GONote: Setting @useself = N’False’ and leaving the remote user/password NULL forces the OLEDB provider to use the Managed Identity of the SQL MI to authenticate.
Scenario 3: SQL MI to SQL Server on an Azure VM
Connecting to a traditional SQL Server hosted on an Azure VM (IaaS) introduces a slight twist. While SQL Server 2022+ supports Entra ID authentication, the process of passing a Managed Identity token through a linked server to a VM is highly dependent on your SQL Server version.
Step 1. The Target VM Must Support Entra ID
Unlike Azure SQL Database, which has native Entra ID integration out of the box, your Azure VM needs to be explicitly configured to talk to Microsoft Entra.
- Version Requirement: The target SQL Server on the Azure VM must be running SQL Server 2022 or later.
- The VM’s Own Identity: The target virtual machine must have its own managed identity enabled (either system-assigned or user-assigned). This allows the SQL Server service on the VM to securely query Entra ID to validate incoming tokens.
- Graph Permissions: The VM’s managed identity must be granted three specific Microsoft Graph application permissions (app roles): User.Read.All, GroupMember.Read.All, and Application.Read.All.
- Enable Entra Auth: Once the VM has the correct permissions, you must explicitly enable Microsoft Entra authentication on the SQL Server VM. This option is available under Security, choose Security Configuration.
Step 2. The Network Path (VNet Peering)
Because an Azure VM does not use Azure SQL Gateways or connection policies (like Proxy or Redirect), the network path is purely based on standard Virtual Network routing.
- Same VNet: If your SQL MI and your SQL Server VM are deployed in the same Virtual Network (in different subnets), they can communicate directly over their private IPs without external routing.
- Different VNets: If they are in different Virtual Networks, you must set up VNet Peering (or a VPN connection) between the two networks.
- Firewall Rules: The Network Security Group (NSG) on the SQL MI must allow outbound traffic on port 1433 to the VM’s private IP, and the VM’s NSG (and internal Windows Defender Firewall) must allow inbound traffic on 1433.
Step 3. Granting the MI Access to the VM
Just like with Azure SQL Database, the target SQL Server needs to recognize the source SQL MI as a valid user.
- You will connect to the SQL Server VM (e.g., using SSMS) and create a login for the SQL MI’s System-Assigned Managed Identity, which exists as an Entra user/application.
- The syntax is slightly different for a server-level login on an IaaS VM compared to a contained database user in Azure SQL DB:
-- Run this on the Target SQL Server VM
CREATE LOGIN [your-sql-mi-name] FROM EXTERNAL PROVIDER;
GO

-- Grant necessary permissions (e.g., mapping to a database or granting a server role)
ALTER SERVER ROLE [sysadmin] ADD MEMBER [your-sql-mi-name];
GOStep 4. The Linked Server Script (Run on SQL MI)
The creation script on the SQL MI remains largely the same as your previous setups. The key difference is that your @datasrc will point to the private IP address of the target VM (or its internal DNS name), while still utilizing the Entra authentication provider string.
For Private IP based, use the below linked server creation script.
-- 1. Drop the existing linked server
IF EXISTS (SELECT * FROM sys.sysservers WHERE srvname = N'TargetSQLVM')
    EXEC master.dbo.sp_dropserver @server=N'TargetSQLVM', @droplogins='droplogins';
GO

-- 2. Create the Linked Server
EXEC master.dbo.sp_addlinkedserver
    @server = N'TargetSQLVM',
    @srvproduct=N'',
    @provider=N'MSOLEDBSQL',
    @datasrc=N'tcp:10.0.0.5,1433', -- Replace with the private IP of your Azure VM
    @provstr = N'Encrypt=yes;Authentication=ActiveDirectoryMSI;' -- Instructs the provider to use the MI's Managed Identity
GO

-- 3. Map the login
EXEC master.dbo.sp_addlinkedsrvlogin
    @rmtsrvname = N'TargetSQLVM',
    @useself = N'False';
GOFor Hostname, use the below script.
-- 1. Drop the existing linked server
IF EXISTS (SELECT * FROM sys.sysservers WHERE srvname = N'TargetSQLVM')
    EXEC master.dbo.sp_dropserver @server=N'TargetSQLVM', @droplogins='droplogins';
GO

-- 2. Create the Linked Server
EXEC master.dbo.sp_addlinkedserver
    @server = N'TargetSQLVM',
    @srvproduct = N'',
    @provider = N'MSOLEDBSQL',
    -- Use the VM's public DNS name
    @datasrc = N'tcp:your-vm-name.eastus.cloudapp.azure.com,1433',
    @provstr = N'Encrypt=yes;Authentication=ActiveDirectoryMSI;';
GO

-- 3. Map the login
EXEC master.dbo.sp_addlinkedsrvlogin
    @rmtsrvname = N'TargetSQLVM',
    @useself = N'False';
GOTroubleshooting Common Errors
Refer the blogpost for some of the errors I faced during the setup. Fix Azure SQL MI to SQL DB Linked Server Errors Using Entra ID
- Error 18456 (Login Failed): This usually means the Managed Identity hasn’t been granted access on the target server. Double-check that the name matches exactly and that the identity was created using FROM EXTERNAL PROVIDER.
- Cannot connect to Azure SQL DB: Did you forget the @catalog parameter? Azure SQL Database will reject the connection if it tries to hit the master database without explicit permissions.
- Public Endpoint vs. Private Link: Ensure your target server’s firewall allows the source SQL MI’s subnet. If you are using Private Endpoints, ensure DNS resolution is correctly routing traffic to the internal IP.
Feel free to drop a comment if you run into any issues while working with linked servers in SQL MI connecting to other Azure Cloud Databases.