
If you are running tasks manually on your databases, it’s time to automate. SQL Agent Jobs allow us to schedule T-SQL statements against the databases in Azure SQL MI so they run on their own. Today, I’m not going to waste time talking about the theory behind it. I’m just going to show you the practical steps to create and schedule a job right now.
I can explain the approach using two methods.
- Using SSMS (SQL Server Management Studio)
- Using T-SQL Script to create and schedule the agent job.
Pre-requisites
Before starting, ensure you have:
- SQL Server Management Studio (SSMS) installed (latest version recommended).
- An active connection to your Azure SQL Managed Instance.
- Appropriate permissions (You must be a member of the sysadmin role or the SQLAgentUserRole in the msdb database).
In the demo, I am using sysadmin role to showcase the agent job creation and scheduling.
Method 1: Using SSMS to create Agent Job
Create the Database
First, we need to create an empty database named DemoDB_SSMS for the demonstration.
Open SSMS and connect to your instance using your hostname, username, and password.
In the Object Explorer, right-click on the Databases folder and select New Database….
In the pop-up window, enter DemoDB_SSMS as the database name.
Click OK to create it.
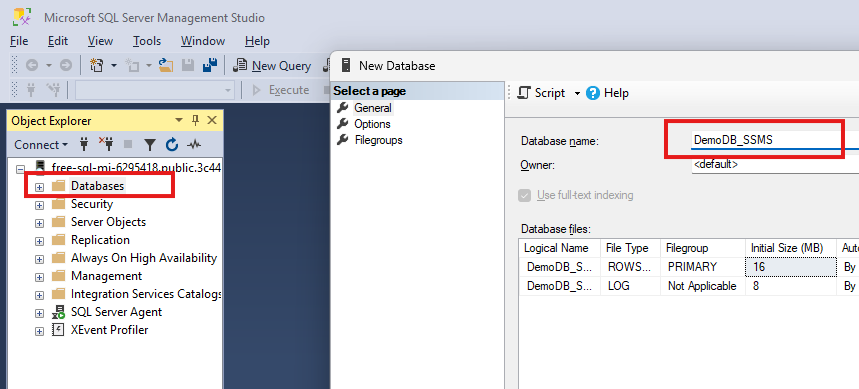
Note: It takes more than 30 seconds to create an empty database in SQL MI. I really don’t like to wait 30 secs for creating an empty db.
Create the Target Table
Next, we need a table to hold the records that our automated job will insert.
Right-click on your new DemoDB_SSMS database and select New Query.
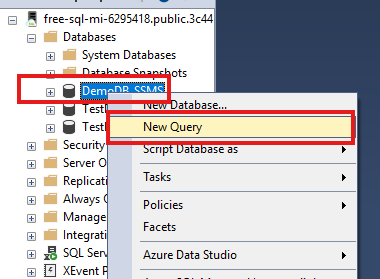
Paste and execute the following script to create a simple audit table:
USE [DemoDB_SSMS];
GO

CREATE TABLE AuditLog (
    LogID INT IDENTITY(1,1) PRIMARY KEY,
    ExecutionTime DATETIME,
    StatusMessage VARCHAR(50) DEFAULT 'GUI Job Executed Successfully'
);
GO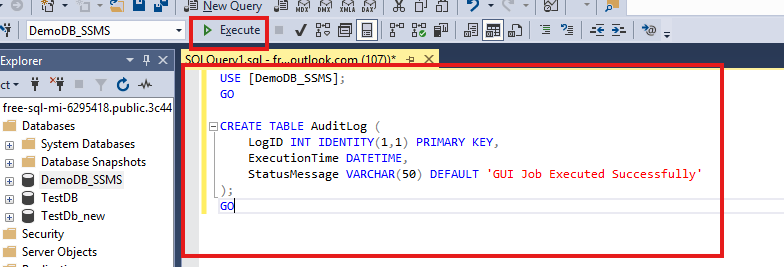
Once you click on execute button, the table will be created inside your database.
Initialize the SQL Agent Job:
Now, let’s set up the automation.
- In the Object Explorer, scroll down and expand the SQL Server Agent folder.
- Right-click on the Jobs folder and select New Job.
- On the General page, type a clear name for your job, such as GUI_Demo_Daily_Insert.
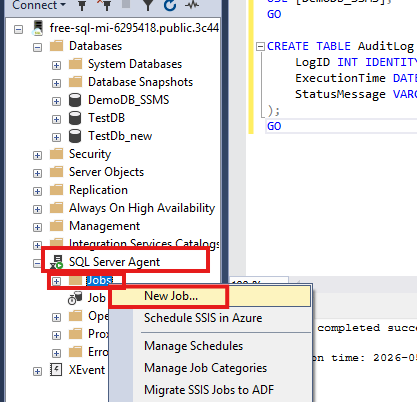
Configure the Record Insertion Step:
This is where we tell the job exactly what T-SQL command to run.
- In the left-hand menu of the New Job window, click on Steps.
- Click the New… button at the bottom.
- Enter a Step name (e.g., “Insert Timestamp”).
- Ensure the Type is set to Transact-SQL script (T-SQL).
- Change the Database dropdown to DemoDB_SSMS.
- In the Command window, paste the insertion script:
INSERT INTO AuditLog (ExecutionTime) VALUES (GETDATE());Click OK to save the step.
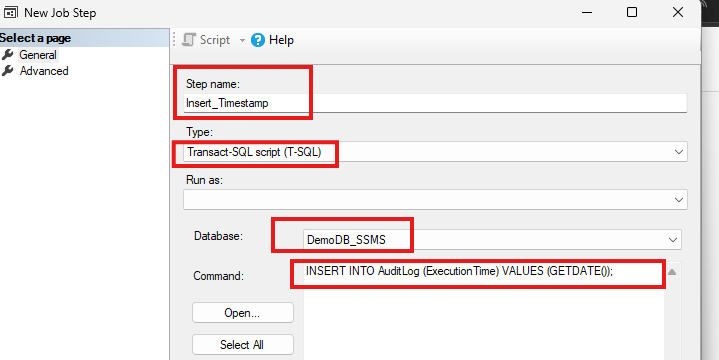
After saving the step, next step is to schedule the job step.
Set the Execution Schedule:
Finally, we define when the job should run automatically.
- In the left-hand menu, click on Schedules.
- Click the New… button.
- Enter a Name for the schedule (e.g., “Daily_Midnight_Run”).
- Under Frequency, select Daily and specify your desired execution time.
- (Reminder: Azure SQL MI runs on UTC time, so you must adjust for the local time zone!)
- Click OK on the Schedule window, and then click OK on the main Job window to save everything.
If you are logged into SSMS using Microsoft Entra ID, SSMS will auto-fill your email as the Job Owner. This will cause Error 14234. Change the Owner to admin name of the instance before saving the job.”
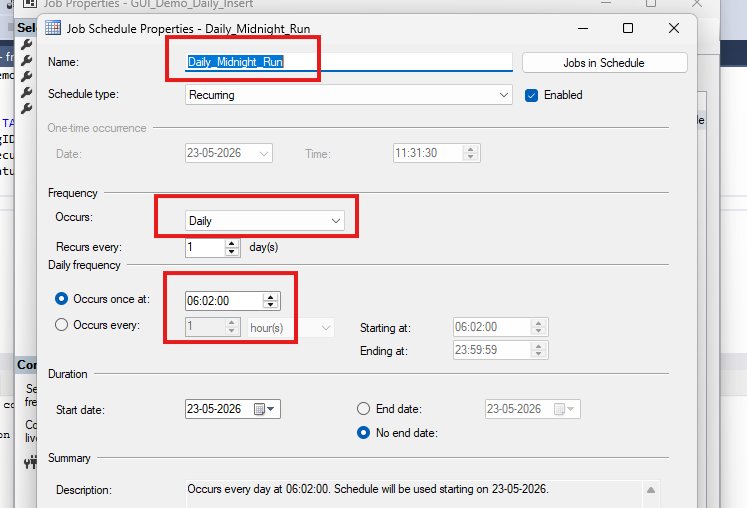
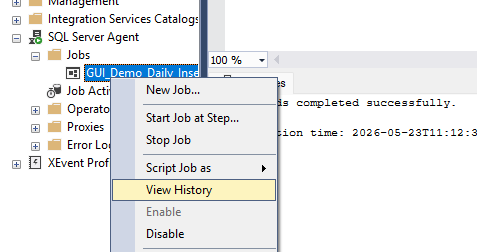
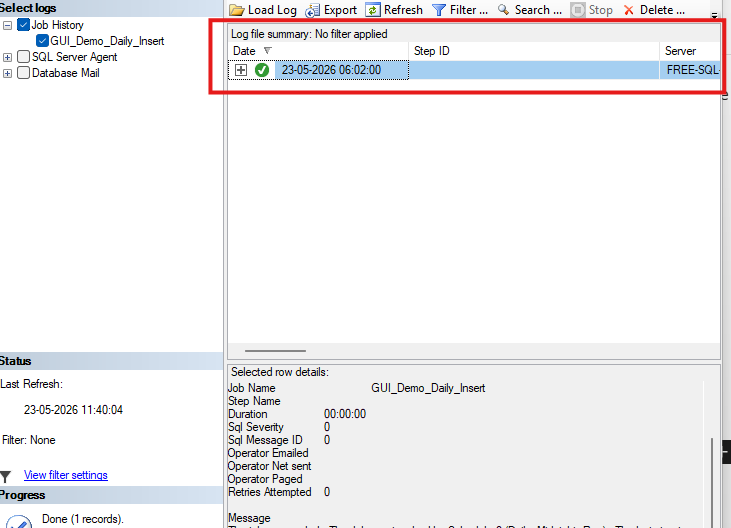
I have scheduled at 6:02 AM UTC and the Job ran successfully. To verify, right click on the agent job and open View History to see the last run.
Query the table AuditLog
SELECT * FROM AuditLog;
Run the query in the SSMS query window, and you’ll notice that the output returns a single record.
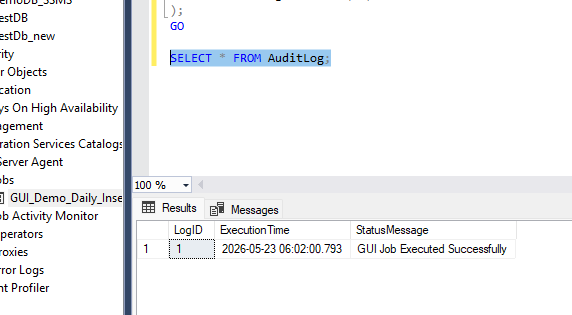
With this, Approach 1 is complete. Next, let’s proceed to Approach 2 and run the single Agent Job script directly.
Method 2: Using T-SQL script to create Agent Job
To proceed with creating and scheduling the Agent Job, open a new query window, then execute the script below to create a new database and table and agent job.
-- ==========================================================
-- 1. Create the Database
-- ==========================================================
CREATE DATABASE DemoDB_TSQL;
GO

-- ==========================================================
-- 2. Create the Target Table
-- ==========================================================
USE DemoDB_TSQL;
GO

CREATE TABLE AuditLog (
    LogID INT IDENTITY(1,1) PRIMARY KEY,
    ExecutionTime DATETIME,
    StatusMessage VARCHAR(50) DEFAULT 'TSQL Job Executed Successfully'
);
GO

-- ==========================================================
-- 3. Create and Schedule the SQL Agent Job
-- ==========================================================
USE msdb;
GO

-- A. Create the Job (Owner explicitly set to 'admin123')
EXEC dbo.sp_add_job
    @job_name = N'TSQL_Demo_Daily_Insert',
    @enabled = 1,
    @owner_login_name = N'admin123',
    @description = N'Inserts a timestamp into the DemoDB_TSQL AuditLog table.';

-- B. Add the Job Step
EXEC dbo.sp_add_jobstep
    @job_name = N'TSQL_Demo_Daily_Insert',
    @step_name = N'Insert Timestamp',
    @subsystem = N'TSQL',
    @command = N'INSERT INTO DemoDB_TSQL.dbo.AuditLog (ExecutionTime) VALUES (GETDATE());',
    @database_name = N'DemoDB_TSQL';

-- C. Create the Schedule (Daily at 6:30 AM UTC)
EXEC dbo.sp_add_schedule
    @schedule_name = N'Daily_630AM_UTC',
    @freq_type = 4,              -- 4 = Daily
    @freq_interval = 1,          -- Every 1 day
    @active_start_time = 063000; -- 06:30:00

-- D. Attach the Schedule to the Job
EXEC dbo.sp_attach_schedule
    @job_name = N'TSQL_Demo_Daily_Insert',
    @schedule_name = N'Daily_630AM_UTC';

-- E. Target the Server
EXEC dbo.sp_add_jobserver
    @job_name = N'TSQL_Demo_Daily_Insert',
    @server_name = N'(local)';
GO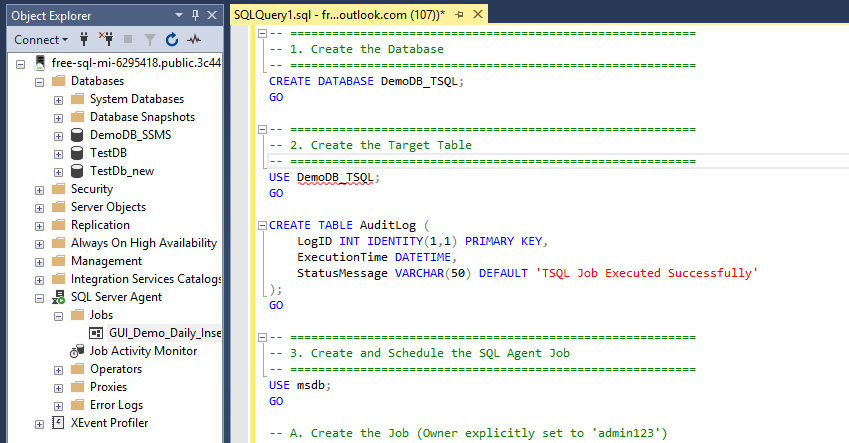
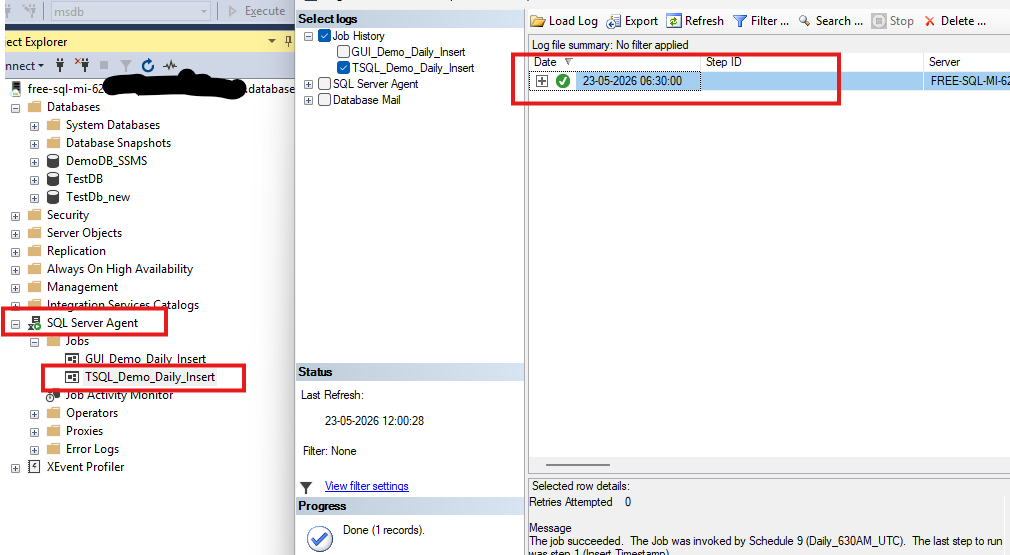
Once the script is successfully executed, go to SQL Server Agent and refresh the Jobs to see the newly created job. To view the job history whether the job ran successfully on the scheduled time, right click on the job and select View History.
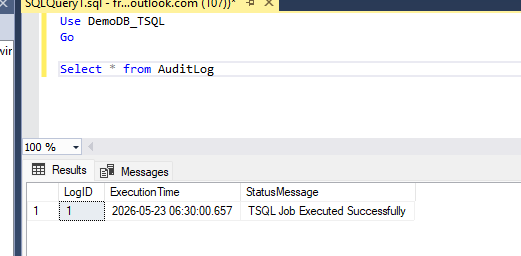
In the below image, my agent job ran successfully at the scheduled UTC time and also I am able to see a record inserted into my table AuditLog in DemoDB_TSQL database.
Deleting Agent Job and Demo Database
After creating and testing the agent job, I always make sure to clean up both the agent job and the database. I use the script below in a New Query window in SQL Server to remove the objects.
To remove the objects from Method 1:
I first replace YourJobName with GUI_Demo_Daily_Insert in the script below (at line 8), and then I change the database name to DemoDB_SSMS.
To remove the objects from Method 2:
I replace the job name with TSQL_Demo_Daily_Insert and update the database name to DemoDB_TSQL.
Note: You can’t use ALTER DATABASE SET SINGLE_USER WITH ROLLBACK to forcibly close connections in Azure SQL MI before dropping a database. Fortunately, for our quick agent job test, you likely won’t have to deal with active sessions anyway!
-- =======================================================
-- 1. Delete the SQL Agent Job
-- =======================================================
USE msdb;
GO

-- Replace with the exact name of the job you created
DECLARE @JobName NVARCHAR(128) = N'YourJobName';

IF EXISTS (SELECT job_id FROM msdb.dbo.sysjobs_view WHERE name = @JobName)
BEGIN
    -- @delete_unused_schedule = 1 ensures orphaned schedules are also cleaned up
    EXEC msdb.dbo.sp_delete_job
        @job_name = @JobName,
        @delete_unused_schedule = 1;

    PRINT 'SQL Agent Job deleted successfully.';
END
ELSE
BEGIN
    PRINT 'SQL Agent Job does not exist.';
END
GO

-- =======================================================
-- 2. Drop the Demo Database
-- =======================================================
USE master;
GO

-- The database name from the tutorial
DECLARE @DatabaseName NVARCHAR(128) = N'databasename';

IF EXISTS (SELECT name FROM sys.databases WHERE name = @DatabaseName)
BEGIN
    -- Execute the drop command
    EXEC('DROP DATABASE [' + @DatabaseName + ']');
    PRINT 'Demo database dropped successfully.';
END
ELSE
BEGIN
    PRINT 'Demo database does not exist.';
END
GOTakeaways
Automating tasks using SQL Server Agent is one of the most effective ways to manage your Azure SQL Managed Instance efficiently. Whether you prefer the visual interface of SSMS or the speed of T-SQL deployment, setting up jobs, steps, and schedules takes only a few minutes.
Remember the two key takeaways from this guide:
- Azure SQL MI operates in UTC time by default, so always adjust your job schedules accordingly.
- If you are using Microsoft Entra ID to log into SSMS, be sure to change the Job Owner to a standard SQL login (like sa or your admin username of SQL MI) to avoid validation errors.
Have questions? If you run into any issues configuring your SQL Agent jobs, or if you need help troubleshooting a specific automation task, feel free to reach out. Drop a comment below or contact me directly, and I’ll be happy to help you get your jobs running smoothly.
For more Technical blog posts, visit CloudNerchuko.in