Hosting a WordPress site on shared hosting is fine for beginners, but when you need serious reliability, security, and scalability, moving to the cloud is the next logical step. Microsoft Azure makes it incredibly easy to spin up a WordPress instance, but the real challenge for many is getting that instance properly connected to a custom domain.
Today, we are going to build it from scratch. By the end of this guide, you will know exactly how to deploy a fully functional WordPress site on Azure and configure your DNS settings so your audience can find you at your custom URL.
Also Read
Want to Launch Free WordPress website on Azure without additional costs using your Free Azure account, read How to create a free WordPress website on Azure cloud
Table of Contents
- Prerequisites & Cost Overview
- Step 1: Sign in to Azure portal
- Step 2: Search for WordPress in the Marketplace
- Step 3: Fill basics details like name, resource group, app service plan.
- Step 4: Choose WordPress Hosting Plan
- Step 5: Configure Site Credentials and Language
- Step 6: Add-ins tab
- Step 7: Networking tab
- Step 8: Review + Create
- Step 9: Deployment in-progress
- Step 10: Check Your WordPress Site without custom domain
- Step 11: Add a Custom Domain in Azure WordPress Site
- Step 12: Enter Domain Name and Add A and TXT records at your Registrar
- Step 13: Login to Domain Registrar
- Step 14: Validate in Azure Portal
- Step 15: Wait for SSL installation for your WordPress website
- Step 16: Website with Custom Domain is running
- Summary: Your Azure WordPress Site is Officially Live!
Prerequisites & Cost Overview
Before you begin, ensure you have an active Azure subscription. The following table outlines the components used in this demo and their associated costs under the Azure Pay-as-you-Go billing.
If you want to launch a website on Azure with a custom domain, the main costs include the Basic hosting plan, database pricing, and storage.
| Component | Service | Cost / Status | Notes |
| Azure Subscription | Any valid Azure Subscription | Free to create | Required to access the portal. |
| WordPress Hosting | Azure App Service (Basic plan) | Paid | At the time of writing this post, $13.87/month. |
| Database | Azure Database for MySQL – B1ms | Paid / Free | Free with Azure Free Account (B1ms instance for 12months). Paid at $17.88 per month Flexible Server Pricing – Azure Database for MySQL | Microsoft Azure |
| Email communication | Azure Emails | Paid | Azure Communication Services pricing | Microsoft Azure Depends on how many emails or calls or messages we are sending. |
| Content Delivery Network | Azure CDN | Free / Paid | Free for the first 10TB each month, with charges applied beyond that limit. Pricing – Content Delivery Network (CDN) | Microsoft Azure |
| Storage on WordPress | Azure Blob Storage – Hot tier | Paid | Cost at $0.024 per GB till first 50TB. |
| Virtual Network (App + DB + Private DNS) | Secure Access | Free and Paid | VNet is free, but if you want Azure to manage your DNS, it costs about $0.50 per domain per month, plus roughly $0.60 per month for every 1 million DNS queries. Keep your DNS with your registrar, like GoDaddy or Hostinger, to avoid extra DNS costs. |
Step 1: Sign in to Azure portal
Navigate to portal.azure.com and log in with your Microsoft account credentials to access your centralized cloud management dashboard.
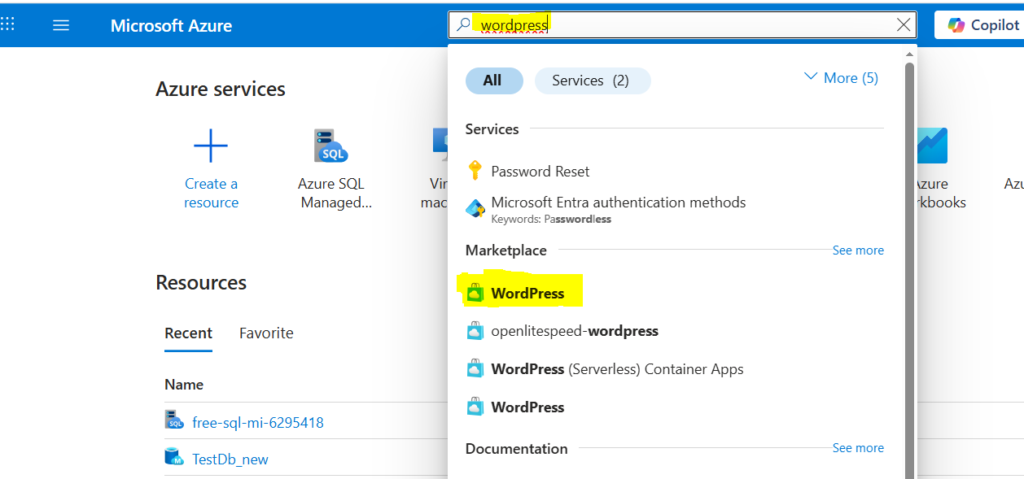
Step 2: Search for WordPress in the Marketplace
In the global search bar at the top of the Azure portal, type “WordPress” and select the official WordPress app from the Marketplace results to begin the automated deployment process.
Step 3: Fill basics details like name, resource group, app service plan.
Enter the essential configuration for your deployment: provide a unique name for your WordPress site, select or create a new Resource Group to organize your resources, and choose hosting plan as Basic to continue.

Step 4: Choose WordPress Hosting Plan
Click on Change Plan and choose Basic hosting plan and click on select button.

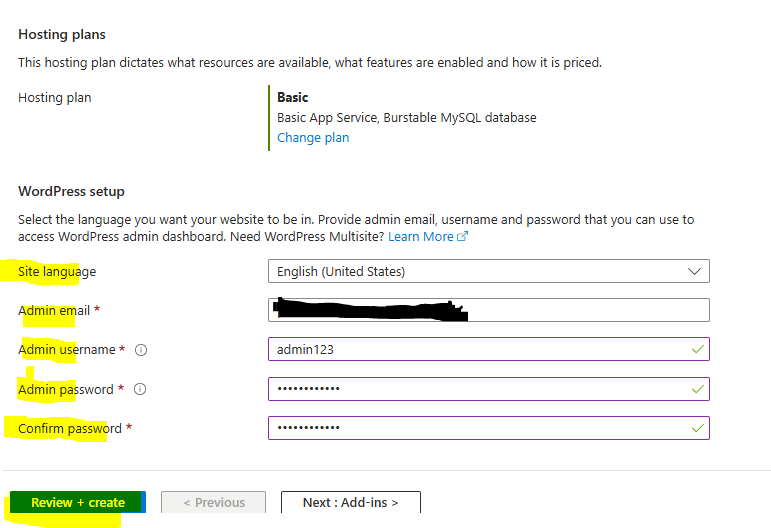
Step 5: Configure Site Credentials and Language
Once your hosting is set up, you will need to define the administrative access for your new website. Enter your preferred Administrator Username, Password, and Email address, which you will use to log in to the WordPress dashboard after the deployment is complete. Additionally, select your Site Language from the dropdown menu to ensure your blog interface is localized exactly how you want it.
For more information, refer Quickstart: Deploy a WordPress site on Azure App Service – Azure App Service | Microsoft Learn
Step 6: Add-ins tab
Uncheck all the options for now as we are not interacting with other resources in Azure for this demo. Based on your needs, you can enable it later. Next, go to Networking tab.

Step 7: Networking tab
The WordPress application, along with its database, will be deployed in a new Virtual Network. You’ll see the VNet name displayed, then proceed to the Review + Create tab.
If you want to add tags to the resource, just do so and then head over to the Review + Create screen.
Step 8: Review + Create
Please review all your details and click the Create button to begin deploying your brand-new WordPress site.
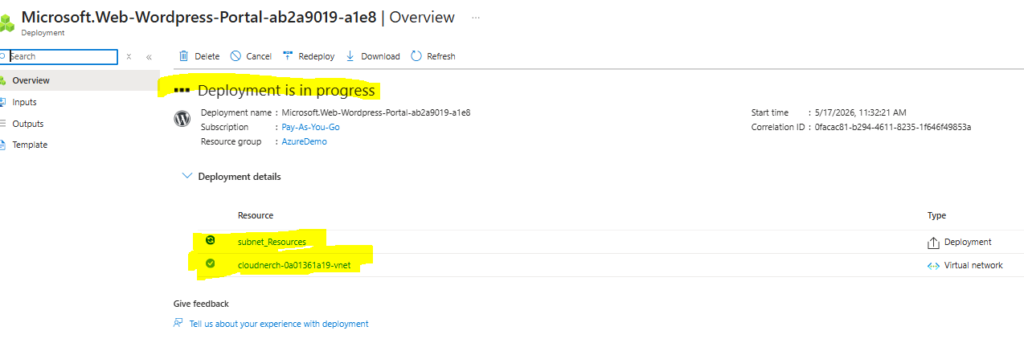
Step 9: Deployment in-progress
Here, the deployment is in progress once you create the resource. Kindly wait for 10 – 15 minutes to see the resource.
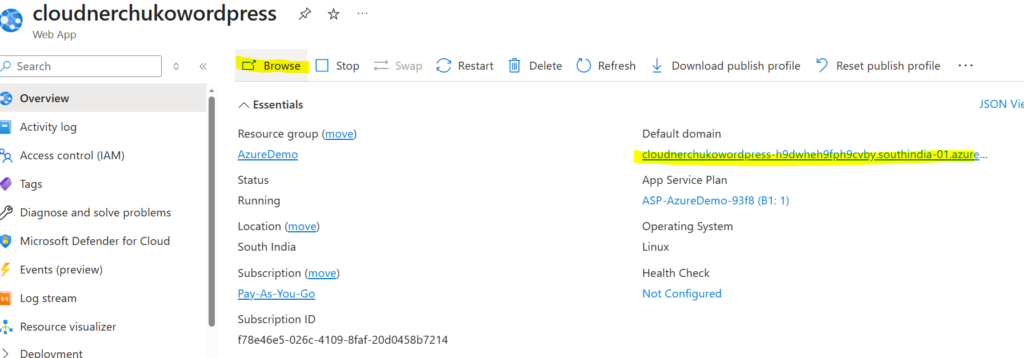
Step 10: Check Your WordPress Site without custom domain
Once the deployment is complete, navigate to the Overview page of your new Web App in the Azure portal. Locate the Default domain link on the right-hand side clicking this URL will launch your live WordPress website. Additionally, you can click the Browse button in the top menu to quickly open your site in a new browser tab and begin the final WordPress configuration.
When you launch the URL, you will see the screen as WordPress is installing. So, kindly wait for 10 -20 minutes to see the sample WordPress website with default theme installed.
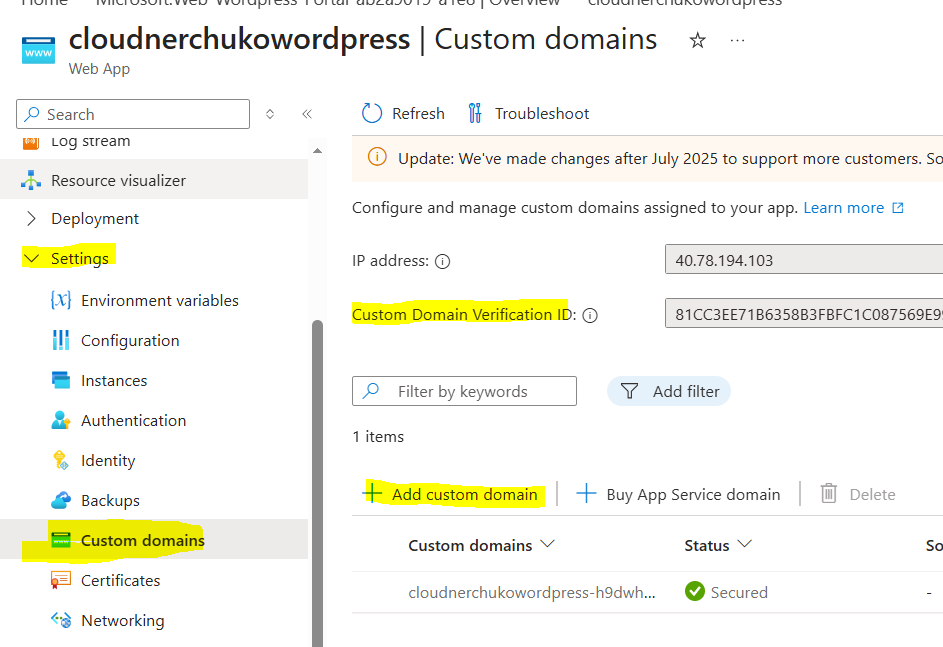
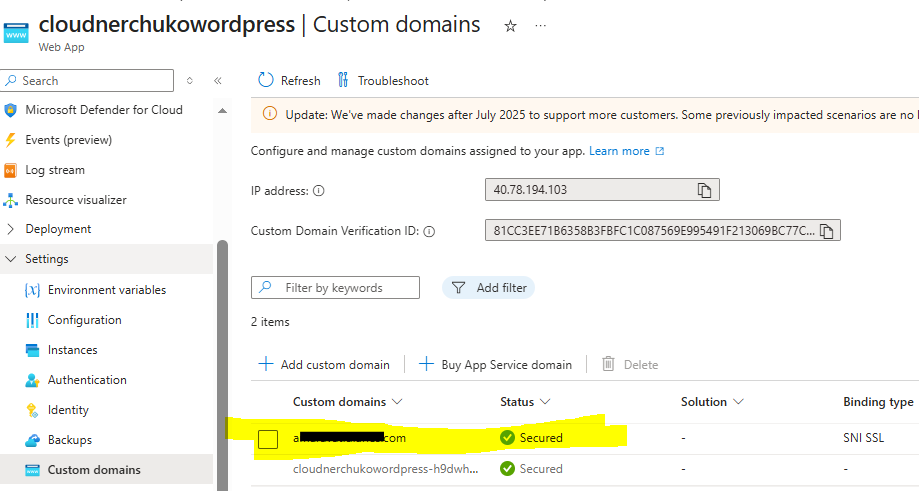
Step 11: Add a Custom Domain in Azure WordPress Site
Select Settings from the left-hand menu, then click the Custom Domains tab as shown in the image below.
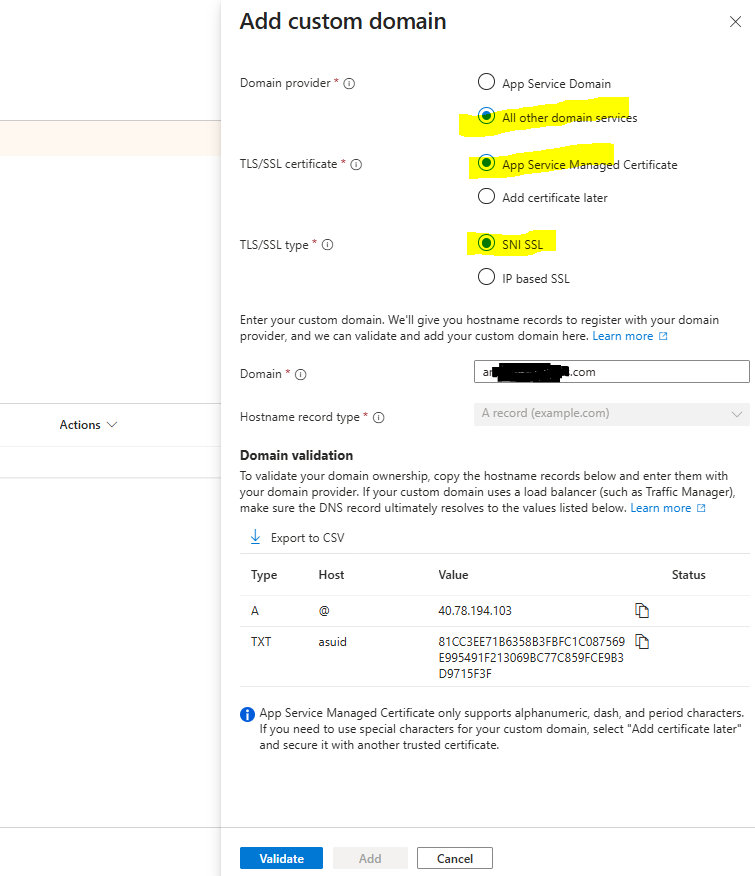
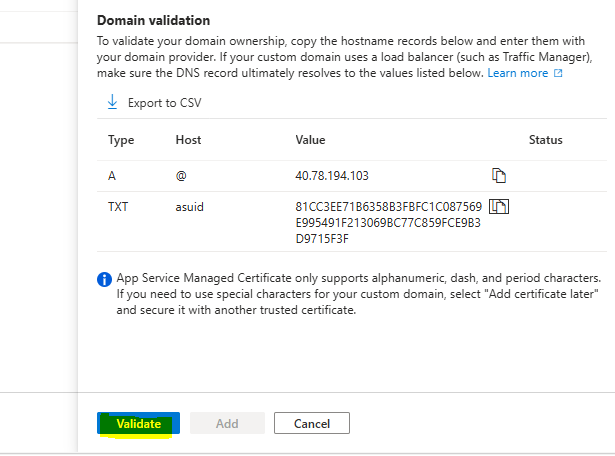
Step 12: Enter Domain Name and Add A and TXT records at your Registrar
Select the options shown in the image to enter your domain name. Once entered, copy the A record and TXT record to your registrar to verify ownership of the domain.
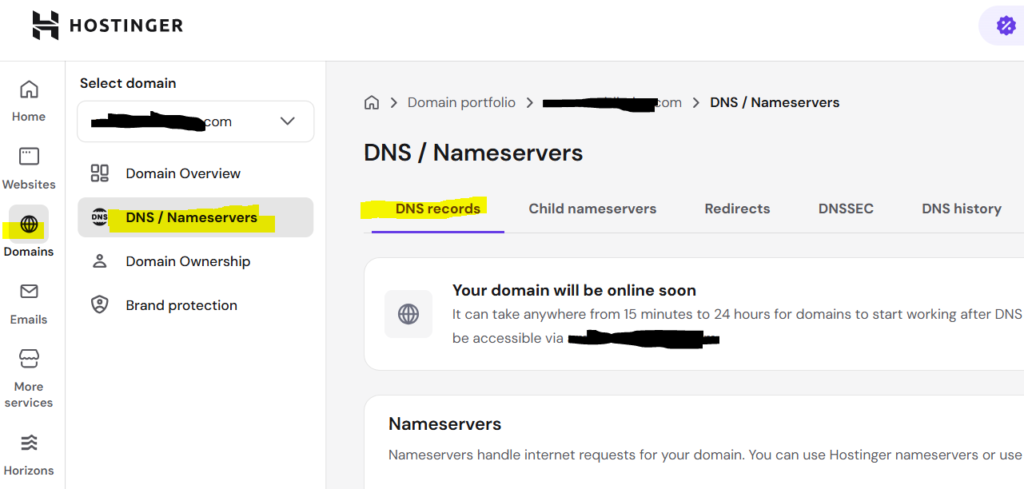
Step 13: Login to Domain Registrar
I bought my domain from Hostinger, so I logged into my Hostinger account and selected the DNS settings for my domain.
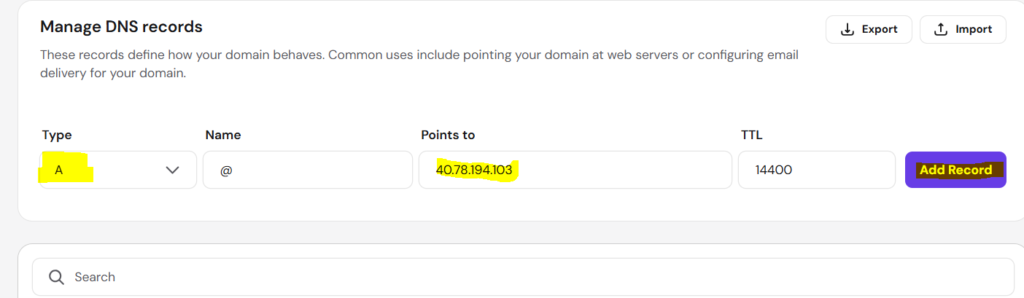
Scroll down slightly to access your DNS records, copy the A record value from Azure Portal, and set up a new A record in Hostinger.
Copy the TXT record value from Azure Portal and setup a new TXT record in Hostinger.

Step 14: Validate in Azure Portal
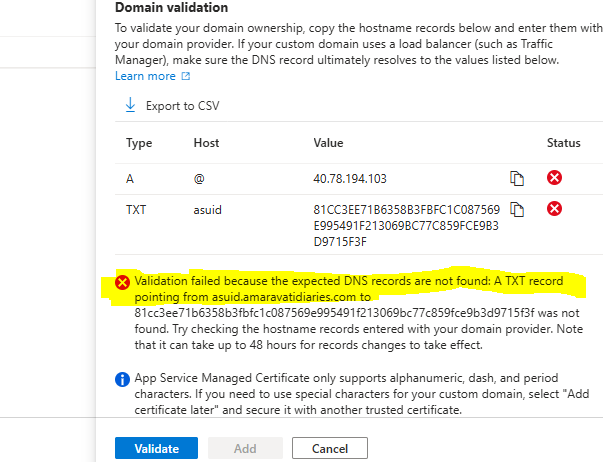
Now after adding the two records in Hostinger, proceed to Azure Portal and click on Validate button.
Adding the DNS records with correct values is very important
I clicked on Validate button and it thrown error stating TXT record is not yet added. It will take generally 5-30 minutes to reflect the DNS changes.
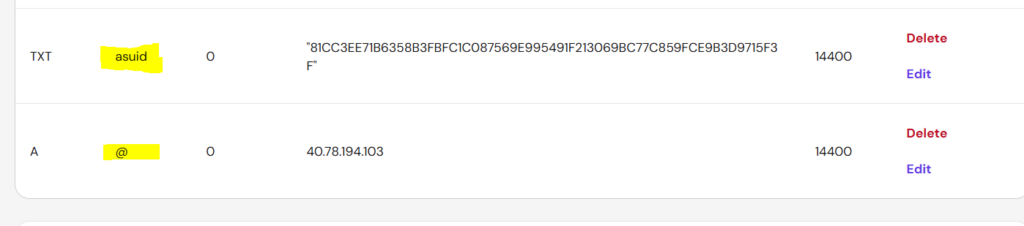
I made a mistake by not adding the name as asuid for the TXT record. I’ve now corrected it in Hostinger by editing the recently added TXT record.
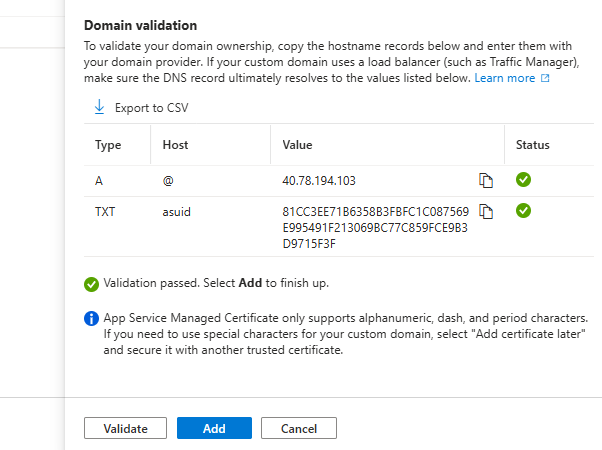
Revalidate in the Azure Portal, and you’ll see that the validation is now successful. Click on Add button to finish the setup.
Step 15: Wait for SSL installation for your WordPress website
With your custom domain successfully linked to Azure, the final step is securing your website with an SSL certificate. Azure automatically communicates with your domain registrar behind the scenes to configure the necessary bindings and enable a secure HTTPS connection for all your visitors.
The binding will be completed within 5 minutes for my website.
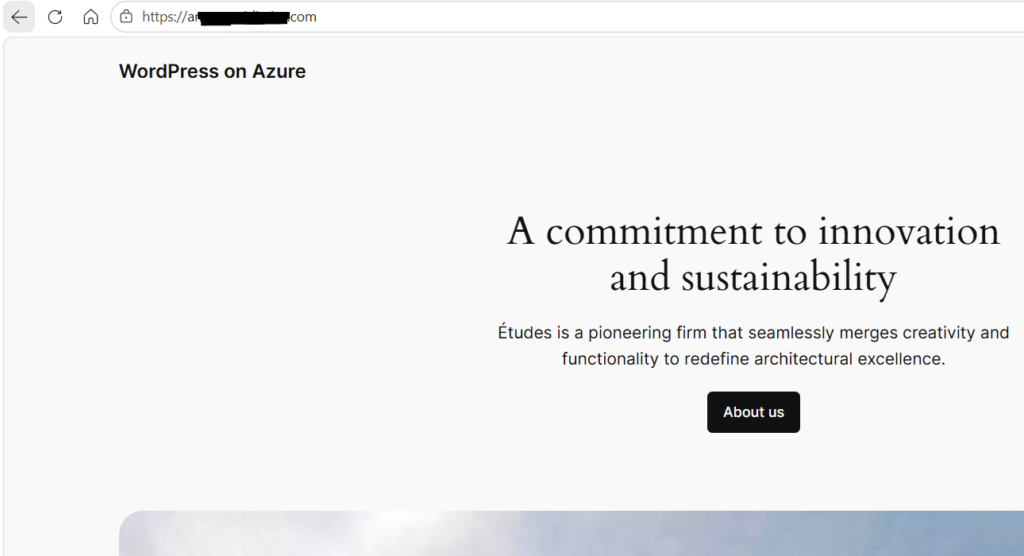
Step 16: Website with Custom Domain is running
Now you can see my custom domain is running on WordPress.
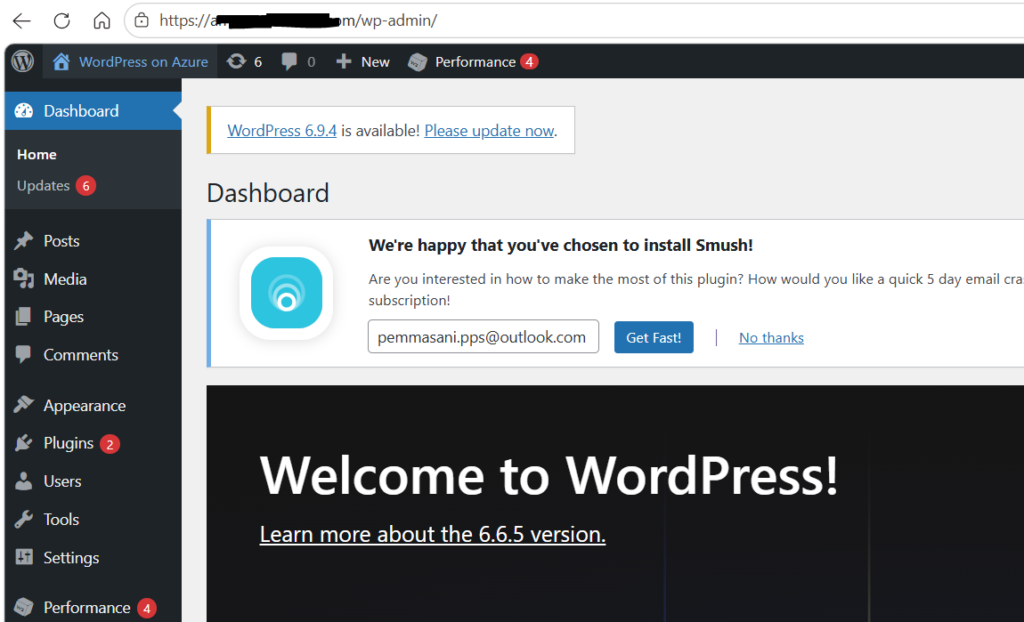
Access the Admin dashboard of WordPress using custom domain
To begin customizing your new site, you need to enter the administrative area. Open your website’s URL in a new browser tab, append /wp-admin to the end of the address (e.g., your-site-url.com/wp-admin), and press Enter. Once the login page loads, enter the Username and Password you created during the deployment process to gain full control of your WordPress dashboard.
Summary: Your Azure WordPress Site is Officially Live!
And there you have it! What started as an empty cloud environment is now a fully functioning, enterprise-grade WordPress website hosted securely on Microsoft Azure.
To recap what we’ve built in this walkthrough:
- The infrastructure: We deployed WordPress on a scalable Azure App Service, backed by a secure, privately networked MySQL database.
- The Branding: We completely moved away from the default azurewebsites.net URL by mapping your unique custom domain.
- The Security: We verified your domain ownership and let Azure automatically provision and bind a free SSL certificate to lock down the site with HTTPS.
Your website is now secure, branded, and ready for the world. You can head over to your WordPress admin dashboard (by adding /wp-admin to your new domain) and start doing what you do best and creating great content and building your brand.
Welcome to the cloud!
Feel free to drop any questions in the comments if you need help setting up your website with a custom domain on Azure WordPress. I’m here to help you get started.
For launching free WordPress website on Azure, go to https://cloudnerchuko.in/how-to-create-a-free-wordpress-website-on-azure-cloud/
For more blog posts, visit CloudNerchuko.in.